Decoration Cookies: For Your Cakes on Doll's Day. For all parents who are looking for unique #cakeideas, I´m happy to share these #Barbiedollcakes ideas for a girl´s birthday! Some of these cakes from this c. Some of the technologies we use are necessary for critical functions like security and site integrity, account authentication, security and privacy preferences, internal site usage and maintenance data, and to make the site work correctly for browsing and transactions. Cookie Recipes; Decorating Classes; Decorators For Hire; Icing Recipes; Tools; Suppliers; Videos; What's Your Favorite Fill in the Blank? Once your cookies are cooled and your piping bags are loaded, it's time to decorate.
 It's often easier to bake cookies on one day and decorate the next.
This is my go-to recipe for decorating cookies and cakes; it works wonderfully and has a beautiful smooth finish.
Add food coloring or flavoring if desired.
You can have Decoration Cookies: For Your Cakes on Doll's Day using 9 ingredients and 28 steps. Here is how you cook that.
It's often easier to bake cookies on one day and decorate the next.
This is my go-to recipe for decorating cookies and cakes; it works wonderfully and has a beautiful smooth finish.
Add food coloring or flavoring if desired.
You can have Decoration Cookies: For Your Cakes on Doll's Day using 9 ingredients and 28 steps. Here is how you cook that.
Ingredients of Decoration Cookies: For Your Cakes on Doll's Day
- Prepare 80 grams of Flour (cake flour).
- It's 40 grams of Sugar.
- It's 10 grams of Almond flour.
- You need 30 grams of Butter.
- It's 2 of or 3 drops Vanilla essence/extract.
- It's 1/2 of of small spoon contained in box Food coloring (red).
- Prepare 1/4 tsp of Matcha.
- You need 2 of pens of the dark brown, 1 pen each of other colors Chocolate decorating pen (dark brown, white, pink).
- It's 1 of Other decorations (silver dragées, chocolate chips).
Browse supplies for baking cakes, cupcakes, cookies, brownies, tarts and more! Featuring baking tools, ingredients, bakeware and other great baking supplies. How to Roll Out Sugar Cookie Dough- Video; Introducing The New and Amazing Precision Rolling Pin- I don't think anyone expects a new baker to buy this rolling pin the first time they make cookies, but I've got one and I love it. If you become a die-hard baker like me, I wanted you to know what I use to make my cookies.
Decoration Cookies: For Your Cakes on Doll's Day instructions
- Place a large bowl on your scale, and measure out the flour, sugar, and almond flour..
- Mix the dry ingredients together, breaking apart any clumps..
- Melt the butter and add to the bowl. Mix the contents and bring the crumbly dough together by pressing it together. Add vanilla essence at this stage..
- Once the dough has come together, slice into thirds..
- Add food coloring to the previously used bowl, and dissolve with a few drops of water..
- Add another third portion of dough the bowl with the red food coloring in small bits, so as to make the mixing process easier. Make sure that the coloring spreads throughout the dough evenly. Once the color has been incorporated, bring the dough together again by pressing the crumbs together..
- In the bowl with the remaining third portion of dough, sprinkle in the matcha. Mix so the color spreads around evenly. Don't dissolve the matcha in water before adding it to the dough..
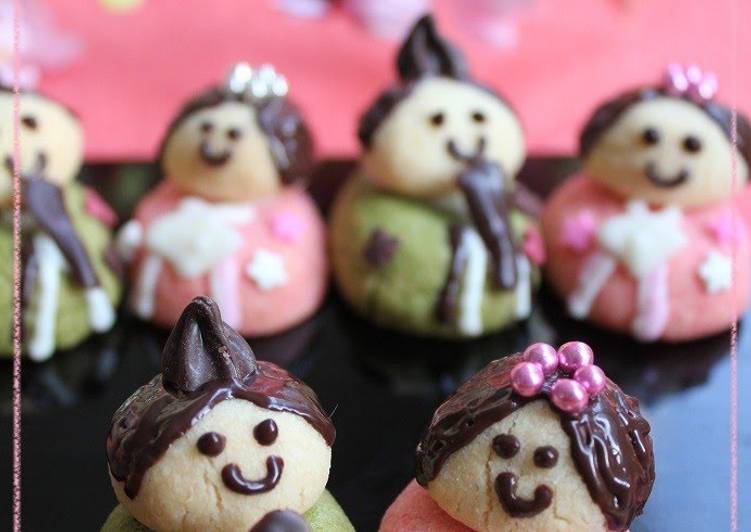
- Divide each color into five portions. Shape them into ellipses..
- This is how they look from the side. They form a little platform, I guess, so the top is a bit narrower than the base..
- With the last remaining third portion of dough for the heads. Round the balls so that they turn out just a tad flat on one side (for the tops of their heads)..
- Line the body and head portions evenly. Bake them first at 150℃ for 15 minutes, then at 130℃ for 5 minutes..
- These are the baked cookies stacked like in Step 10. The heads are slightly flattened. Start warming up the decorating pens in a bain-marie..
- Adjust the position of the heads so that the green emperors slant towards the left, while the pink empresses slant toward the right. This way, they'll look like they're meeting each other in the middle when placed next to one another..
- Draw on the collars of the emperor's robes. They look a bit neater if you slant the emperors' collar "folds" to the right, and slant the empress' to the left..
- Use a white chocolate decorating pen to outline the sleeves..
- Draw the outlines of their robes with a chocolate decorating pens. You can use the pink color to give your empress sleeves and collars as well..
- Trace out the emperors' hairlines. This is how they look from a bird's eye view. Fill in the outlines with a chocolate decorating pens. Spread the chocolate evenly with the tips of their pens..
- This is how the emperors look from the back. I tried to keep their hair up to the middle of the backs of their heads..
- Place chocolate chips on top of heads of the emperors, to give them little ritual crowns. You can glue these on with a chocolate decorating pen..
- Give your empresses hair. Leave some space in the front for their faces, but the hair can reach all the way down the back, up to their shoulders. Decorate the tops of their heads with dragée pearls..
- These are how the empresses look from behind. I did haven't much of the dark brown decoration left at this point, so I skimped a bit... They would probably have looked better if their hair was a bit longer..
- Give your dolls cute faces. Make them laugh, have them look prim and smug -- have fun giving them all sorts of expressions!.
- Stick on some extra decoration on the robes as desired. I used sprinkles that I had left over from Valentine's Day. If you have any chocolate left over in your decorating pens, this would be a good time to use it up!.
- Here are the emperors. I gave their robes a refined touch with some brown embellishments..
- Take the size of your dolls into consideration and draw out the fans and ritual batons with the chocolate decorating pen. Draw them on top of a baking sheet and chill in the refrigerator to harden..
- Use the chocolate from your decorating pen as glue to stick on the dolls' fans and ritual batons where their hands would be..
- Perch them on top of your pretty cakes. Prepare them about 2-3 days in advance and set them on your cakes the day of the celebration..
- We're a five-member household, so I prepared five pairs of dolls this time around. But it's a good idea to make four pairs and use up the material for the last one to make other items like "Hishimochi" (decorative tri-color mochi associated with Doll's Day)..
See more ideas about Sheet cake designs, Sheet cake, Cake. Make professional-looking decorated cookies at home with just a few tools and a little imagination. Tools to Use These tools make decorating easier: candy sprinkles, mini offset spatula, squirt. Our Disney cake toppers feature all your favourite characters! Whether you're looking for a Frozen cake topper set, Disney princess cake toppers or even a Disney wedding cake topper - you're sure to find it in our magical selection.